There are many type of key lock available offering differing degrees of security. For instance on some very old safes, the locks had only 5 or 6 levers and no anti pick protection. Others may have 14 levers with anti pick protection - it is obvious which will be the most secure.
LaGard 2200
The Lagard 2200 is an odd one in that it is in truth a combination lock which uses a key and was designed as a replacement for combination locks where the customer has decided that they would prefer a key lock to a combination lock. Below is a set of instructions for the Lagard 2200.
SETTING THE KEY LOCK TO A NEW OPERATING KEY USING THE BRASS SET-UP KEY
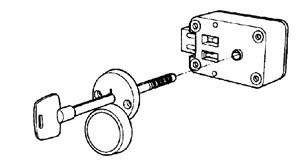
The lock comes from the factory keyed to a standard brass Set-up Key. To set up a new key to a Lock straight from the factory, (after installation of the lock) you will need a brass Set-up Key, LaGard Group 2 change key, and a regular Operating Key. On the Escutcheon, which should be fitted to the front of the safe door, is a mark called the Escutcheon Index.
On the brass Set-up and Operating Keys there is also a mark referred to as the Key Index. Insert the Set-up Key into the escutcheon. Turn RIGHT until it stops and open the safe. With the safe door open, turn the key all the way to the LEFT, which locks the lock. Do not remove the Set-up Key.
Turn the Set-up Key slowly RIGHT until the Key Index is lined-up at the Escutcheon Index. Do not turn the key all the way - the lock bolt should not be retracted.
Insert the ‘L’ shaped change key into the change key hole In the back of the lock. Turn the change key RIGHT until it stops (approximately one-quarter turn). Leave the change key in the lock.
Turn the Set-up Key LEFT and remove. Using a regular Operating Key, turn slowly to the RIGHT until the Key Index is lined-up with the Escutcheon Index.
Leave the Operating Key in this position. Turn the ‘L’ shaped change key LEFT and remove it. Turn the Operating Key all the way to the right several times to test the change has worked and the lock bolt retracts properly before closing the safe door. After closing the safe door, turn the Operating Key LEFT and remove. As the lock is ‘Key Retaining’ the Operating Key can not be removed if the lock is open.
TO CHANGE OPERATING KEYS
Insert the currently-used Operating Key. Turn RIGHT until it stops and open the safe. With the safe door open, turn the key all the way to the LEFT, (if your safe has a handle, turn the handle as if locking the safe first) which locks the lock. Do not remove the Operating Key.
Turn the Operating Key slowly RIGHT until the Key Index is lined-up with the Escutcheon Index. The lock bolt should not be retracted. Insert the change key into the change key hole in the back of the lock. Turn the change key RIGHT until it stops (approximately one-quarter turn). Leave the change key in the lock. Turn the Operating Key LEFT and remove.
Using a NEW Operating Key, turn slowly to the RIGHT until the Key Index is lined-up with the Escutcheon Index. Leave the new Operating Key in this position. Turn the change key LEFT and remove. Turn the new Key all the way to the right several times and retract the lock bolt before closing the safe door. After closing the safe door, turn the new Key LEFT and remove. The new Key can not be removed if the lock is open.
Spares
There are many spares available for safes which are built for purpose. Below you will find some of them. If you need one of these spare parts, please email us for a price.
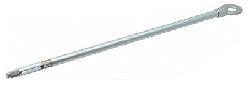
Here we have a key stem for a Tann safe lock. As the doors to high security safes are often very thick, the key needs to be long enough to go through the door to reach & open the lock.
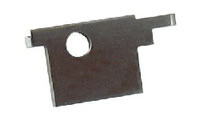
As you can see in the picture above, there is no 'bit' to the key (the part which opens the lock). The picture to the left shows the separate 'bit' which is fitted into the key stem when the safe needs to be opened -obviously, this one has yet to be cut to suit the lock it is to open. The 'bit' is slipped into the stem and a small nut at the end is tightened to secure the key 'bit' in place
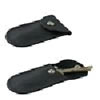
The whole idea with these parts is to have a key which is long enough to open the safe, but where you are able to remove the main part of the key and take it off site at the end of the day. This picure shows the small keybit wallets available for the safe ekkping of these slipbits. This type of key has been used by manufacturers such as Tann, Chubb, SMP for many years.
Combination Locks
Combination locks have been in use for over 100 years and in countries such as America, they are the most common safe lock in use. The British and European markets have always favoured the traditional keylocks, but with the advent of electronic locks, this trend has begun to change in recent years. (You can find out more regarding electronic locks by clicking on the relevant sub menu).
An introduction to using combination locks
Disclaimer
These instructions have been put together from experience by our engineers and are general guidelines only. Please note therefore, Bradley's cannot accept any responsibility whatsoever for mistakes or errors in the following articles. It is ALWAYS recommended that ANY changes made to codes, either electronic or mechanical, are done with the door of the safe or container OPEN and preferably in the earlier part of the day to ensure that help can be easily sought if necessary.
Please read the instructions carefully before operating the lock or proceding with changing the combination.
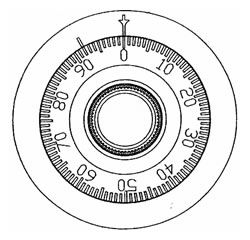
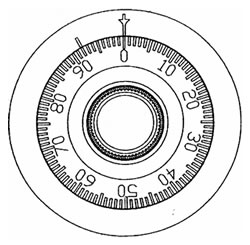
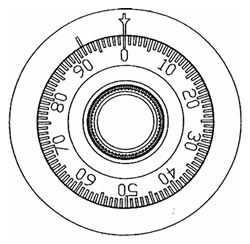
There are two marks on the dial ring (see drawing). The mark at the top (the opening index) is used for opening the lock. The index 30° to the left is used only when changing the combination. The dial should always be turned slowly and evenly. A Revolution is counted each time the selected number is aligned with the opening index.
Do not turn the dial back to compensate for overdialing a number. If, when dialling the combination, any number is turned beyond the opening index, the entire sequence must be repeated from the start.
3 Wheel Combination Locks
Opening the 3 wheel combination locks
These 3 wheel locks are made by a number of manufacturers and common factory settings are
50-25-50
10-20-30
50
To unlock on a 3 number combination (For Example 50-25-50)
1. Turn dial to the LEFT stopping when 50 is aligned with the opening index, the FOURTH time.
2. Turn the dial to the RIGHT stopping when 25 in aligned with the opening index, the THIRD time.
3. Turn the dial to the LEFT stopping when 50 is aligned with the opening index, the SECOND time.
4. Turn the dial slowly to the RIGHT until the bolt retracts.
To lock
Turn dial to the LEFT at least four full revolutions.
New Combinations
Setting a 3 wheel combination lock
WARNING: NEVER INSERT THE CHANGE KEY IN THE LOCK WHEN THE COVER IS REMOVED. BEFORE TURNING THE CHANGE KEY, MAKE SURE THE WING OF THE KEY IS FULLY INSERTED INTO THE LOCK.
Changing The Combination
Select three new numbers. For technical reasons, we strongly recommend you DO NOT use any number between 95 and 20 for the last number. For maximum security, try not to use numbers that end in 0 or 5, and do not use numbers in sequence such as 35-36-37. Also 27-48-56 is not as good as 56-27-48
1. Dial the existing combination on the opening index (see steps 1-2-3 above or directions for opening when on factory setting). Open door of container and throw the bolts using the handle.
2. Dial the existing combination again, this time to the changing index. Only use steps 1-2-3 in other words, do not turn the lock as if you were going to open the safe.
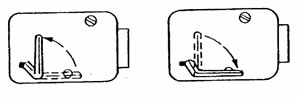
3. With the last number set at the changing index, hold the dial securely and insert the change key in the keyhole in the back of the lock. Make sure the wing is entirely inside the lock and comes to a positive stop (see picture above) before turning the key.
4. Turn the key one-quarter turn to the LEFT (see picture above). With the change key in this position, set the new combination as follows: turn the dial to the LEFT, stopping when the first number of the new combination aligns with the changing index the FOURTH time.
5. Turn dial to the RIGHT stopping when the second number is aligned with the changing index, the THIRD time.
6. Turn the dial to the LEFT, stopping when the third number is aligned with the changing index, the SECOND time. Holding the dial in this position, turn the change key back to the RIGHT and remove it. (See Figure 2). The new combination you have chosen is now set in the lock.
CAUTION BEFORE CLOSING THE UNIT try the new combination several times using your new combination
4 Wheel Combination Locks
Using high security 4 wheel combination locks
These 4 wheel locks are made by a number of manufacturers for use on higher security safes and cabinets. Common factory settings are
50-25-50-25
10-20-30-40
20-40-60-80
All numbers set to 50
READ AND FOLLOW INSTRUCTIONS CAREFULLY BEFORE OPERATING THE LOCK AND WHEN CHANGING THE COMBINATION
There are two marks on the dial ring (see 3 wheel lock drawing). The index at the top is used for opening the lock. The index 30° to the left is used only when changing the combination.The dial should always be turned slowly and evenly. A Revolution is counted each time the selected number is aligned with the opening index.
DO NOT TURN THE DIAL BACK TO COMPENSATE FOR OVERDIALING A NUMBER.
If, when dialling the combination, any number is turned beyond the index, the entire sequence must be repeated.
TO UNLOCK ON A 4 NUMBER COMBINATION (For Example 50-25-50-25)
1. Turn dial to the RIGHT stopping when 50 is aligned with the opening index, the FIFTH time.
2. Turn the dial to the LEFT stopping when 25 is aligned with the opening index, the FORTH time.
3. Turn the dial to the RIGHT stopping when 50 is aligned with the opening index, the THIRD time.
4. Turn the dial to the LEFT stopping when 25 is aligned with the opening index, the SECOND time.
5. Turn the dial slowly to the RIGHT until the bolt retracts.
To lock the combination lock
Turn dial to the LEFT at least five full revolutions
Setting a new number on a 4 wheel combination lock
WARNING: NEVER INSERT THE CHANGE KEY IN THE LOCK WHEN THE COVER OF THE LOCK IS REMOVED. BEFORE TURNING THE CHANGE KEY, MAKE SURE THE WING OF THE KEY IS FULLY INSERTED INTO THE LOCK.CHANGING TO A NEW COMBINATION
Select four new numbers, for technical reasons, DO NOT use any number between 95 and 20 for the last number. For maximum security, you should not use numbers that end in 0 or 5, and do not use numbers in sequence. E.g., 36-46-56-66 is not as good as 56-66-46-36.
Dial the existing combination on the OPENING INDEX (see steps 1-2-3-4-5 above or directions for opening when on factory setting). Open door of container.
2. Dial the existing combination again, this time using the changing index following steps 1-2-3-4. Do not complete step five.
3. With the last number set at the changing index, hold the dial securely and insert the change key in the keyhole in the back of the lock. Make sure the wing is entirely inside the lock and comes to a positive stop (see Figure 1) before turning the key.
4. Turn the key one-quarter turn to the LEFT (see Figure 1). With the change key in this position, set the new combination as follows: turn the dial to the RIGHT, stopping when the first number of the new combination aligns with the changing index, the FIFTH time. Dial LEFT, stopping when the first number of the new combination aligns with the changing index the FOURTH time.
5. Turn dial to the RIGHT stopping when the second number is aligned with the changing index, the THIRD time.
6. Turn the dial to the LEFT, stopping when the third number is aligned with the changing index, the SECOND time. Holding the dial in this position, turn the change key back to the RIGHT and remove it. (See Figure 2). The new combination you have chosen is now set in the lock.CAUTION: BEFORE CLOSING THE DOOR try the new combination several times using the new code with the door open.
Manifoil Combination Locks
The Manifiol lock was designed for high security use in areas such as the armed forces, embassies and other situations where a lock which could not be manipulated was required. The Mk IV version even has lead shielding to block the possibility of someone using an X-ray machine to read the wheel positions!
Unless ordered otherwise locks are supplied to operate in position “A” as per standard instructions for use - do not use numbers between 95-10 for your third number.
Unless ordered otherwise locks are supplied to operate in position “A” as per standard instructions for use - do not use numbers between 95-10 for your third number.
If the lock is required for use in position “C” zero “0” becomes number 75 - do not use numbers between 70-85 for your third number.
To open
1. turn clockwise > stopping when the first number comes the fifth time to the arrow mark.
2. turn anti clockwise < stopping when the second number comes for the fourth time to the arrow mark.
3. turn clockwise > stopping when the third number comes the third time to the arrow mark.
4. turn anti clockwise < stopping when 0 (zero) comes to the arrow mark the second time
5. turn clockwise > slowly until the lock operates and the dial refuses to turn any further.
To lock turn the dial anti clockwise at least five times
To set up a new combination of three numbers
With the door open throw the bolts and turn the combination lock dial at least five full turns counter clockwise thus locking the combination lock.
Choose your three numbers. N.B. Do not choose consecutive numbers such as 33, 34, or 35. Do not choose all tens or fives as 10, 20, 30, or 50, 55, 60.
Special note
If these instructions have been followed with care no difficulties will be experienced in operating the lock. If however an error has been made and the lock refuses to operate the following procedure should be adopted.
Redial the combination on the straight mark and re-insert the change key into the back of the lock.
• If the key enters freely and to its fullest extent this indicates incorrect setting when trying to unlock on the new combination withdraw key without turning and carry out the unlocking sequence again with the new combination taking care as each number comes up to the mark on its final turn.
• If the key only enters fully after overcoming a little resistance this indicates a slight inaccuracy in setting up the new combination. To remedy this turn change key and repeat the entire setting procedure as detailed above.
• If the key will not enter fully this indicates a major error in setting up the new combination and the assistance of a qualified person should be sought.
• Do not insert change key in to the square keyway in the wheels when the lock cover is removed. The keyhole in the cover is exactly positioned to hold the key firm at the correct angle in relation to the wheels and if you insert the key without having the cover in place you are likely to upset the relative position of the mechanism in the wheels. The lock cannot then be made to operate.
• Ensure that there is a difference of at least 5 between each number by distributing the numbers well over the dial. Take care not to have any number suggesting its possible successor.
• Important – do not use numbers between 95 and 10 for the third number of your combination
• Carry out the sequence of unlocking with the existing combination but using the straight mark, as your stopping point and stopping when the third number comes to this mark the third time. Do not move the dial from this position.
• Remove access plate (if fitted) on inside of safe door thus exposing back of lock.
• Do not remove lock cover
• Insert change key in keyhole in back of lock until the wing of the key has passed right in to the hole, turn the key ¼ turn anti clockwise - leave key in this position.
• Important do not attempt to turn the key until the wing has passed completely into the keyhole and the collar on the key is right up against the back of the lock.
Electronic locks have come a long way over the last 10 years or so. The advantage of an electronic lock lies in not having to carry around a key and the subsequent possibility of losing the key. Electronic locks usually also have the advantage of being able to have the combination number changed at the owners wish, so in the event of a combination being learnt by someone who should not have access to the safe or door, it can be changed quickly and easily. Some establishments such as banks and embassies, change the combination numbers on a regular basis, sometimes as frequently as every week, in order to ensure optimum security. Some of the more well known manufacturers are: LaGard, Mas Hamilton, (now Kaba Mas) EDL, & Secu.
Following is a range of some of the more common locks available and their basic functions.
LaGard Comboguard 33e series combination lock
Simple Operating Instructions
Please enter each digit slowly and distinctly.
The lock will signal audibly at each entry.
To open lock (the factory setting is 123456 or 111111).
Enter your combination. The lock will signal twice.
Turn the keypad clockwise to open the lock.
To close the lock.
Close the safe door.
Turn the keypad anticlockwise until straight.
Changing the combination
Open safe door
Enter six zeros
Enter old combination
Enter new combination twice
Incorrect Combination Change
The lock signals three times and the old combination is still valid.
Try again and test the new combination several times before closing the safe
Changing the battery (use only alkaline batteries)
Repeated beeping during an opening indicates that battery is low
Pull off the battery box cover.
Replace batteries
Replace cover
Wrong try penalty
The entry of four consecutive invalid combinations will start a 5-minute delay period. The keypad flashes red at 10- intervals. At end of penalty period, two more consecutive invalid combinations will restart the 5-minute delay period.
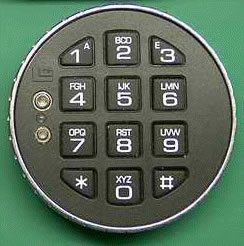
Emergency Battery Terminals
If the keypad is completely dead, the most likely cause is that the internal battery is exhausted. However, the safe can still be opened using the emergency terminals as follows.
Hold a new 9-volt alkaline battery against the terminals on the left hand side of the keypad (see picture above). The larger battery terminal should be mated with the larger lock terminal (big to big, small to small). Hold the battery in place whilst entering the code and turning the dial. Once the safe is open replace the internal battery. Instruct the safe user on the low battery warning.
If the time delay feature is active you will not be able to hold the battery in place for a long period. Therefore use a battery connector with wires. Push the wires into the holes in the emergency terminals with black going to the larger terminal and the red to the smaller. Use tape to hold the wires in place.Plug a new 9-volt alkaline battery in to the connector and enter the code to start the time delay period. Once the safe is open replace the internal battery. Instruct the safe user on the low battery warning.
The Diplomat EDL Safe Lock
Emergency Battery Terminals
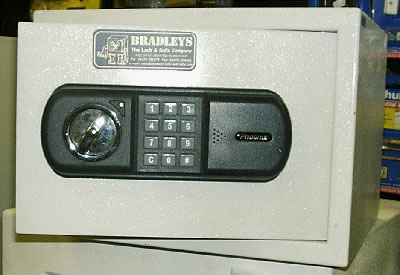
The E-D-L electronic safe lock has been used for many years on various fire and security safes brought in from the Far East such as those supplied by Phoenix and other importers.
The lock will look similar to the one shown on the right but may also be fitted with a handle rather than the small knob as shown here.
Before use, slide Battery Housing Cover to the right to open, and load 4 1.5V Alkaline batteries in the battery case. The initial code from the factory is 1 2 3 or 1 2 3 4
Step 1 - Push Start Button C (LED lights with 'Bi' sound).
Step 2 - Push Initial code 1 2 3 in sequence (Whenever each button is pushed, it sounds 'Bi')
Step 3 - Push Finish Button # (You hear a melody).
Step 4 - Turn Knob clockwise to open door while melody goes on.
Note: In case of wrong code, you hear a 'Bi Bi Bi Bi' sound. If a wrong code is used over 3 times, the lock freezes and keeps quiet until it is released/unfrozen.
How to release a frozen lock
With the original or correct personal code, proceed the above opening steps (1 to 3) twice consecutively (You hear a melody).
How to Enter Your Own Personal Code
* * Always keep the door open until you are happy the new code works * *
Step 1 - Push Memory Button M on the inside of the door. (LED lights with 'Bi' sound).
Step 2 - While LED lights on, enter your new personal code by pushing your chosen code for instance, 197568 sequence (up to a max.17 digits)
Step 3 - Push Finish Button # (You hear a melody)
* Warning: Confirm the personal code is correctly entered, please keep the door open whilst using the new personal code prior to closing door. *
When and How to Replace Battery
When Start Button C is pushed, if there sounds a series of 'Bi Bi Bi Bi", or the door is not opened in spite of normal LED flash with melodic tone, it indicates that the batteries have to be replaced (Use 4 AA size 1.5V Alkaline batteries) The entered code will NOT be erased, even if battery is completely exhausted.
SMP 'Inner coffer' time/delay lock series C5 to C9.
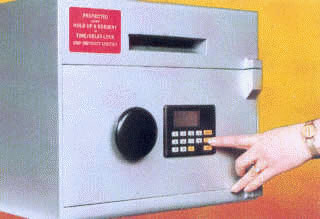
SMP have used the C series lock on their inner coffers for some years. The lock is used to set a time delay and opening times on the inner coffer. For instance, the safe is factory set to open between 10:00 and 12:00 and then again between 17:00 and 19:00. Anyone trying to open the coffer outside of those times will be unable to do so. If you do try to open the coffer with the correct code during the accepted times, the safe is set to delay opening for 10minutes from the time the code is inputted. These times can all be changed according to the instructions below.
The instructions below apply to the C5, C6, C8 & C9. However, functions 6 onwards do not apply to the C5
How to use the SMP 'Inner coffer' time/delay lock series C5 to C9.
Code
A single code of four digits is used to open the coffer, which on newer models is factory set to 0000 - use this code to open the coffer initially then set your own. Take care when setting your new code and do not lose it.
To Open
Press OPEN and enter the code. The delay will start to count down .You must wait for the delay to elapse and then press open and turn the handle.
To Close
Press LOCK and turn the handle
To Change Settings
To set your own code and times etc, you must first open the coffer and with the door open, press set followed by the relevant number below to select the feature as per the menu below.
Set + button 1
Sets your new code. Simply key in your own four-digit code.
Set + button 2
Sets the first time slot open & close. Set open first when shown. Set close when shown.
Set + button 3
Sets the second time slot open & close. Set as above.
Set + button 4
Sets the time. Key in the time of day (24 hour clock).
Set + button 5
Sets the time delay. Key in the delay you want in minutes (0-60).
Set + button 6
Sets todays date for audit trail. For 25th October 2006 enter as 251006
Set + button 8
Audit trail for the last 20 openings. The data is shown for each opening as: Time HH-MM, Date DDMMYY, code XXXX.
Time locks were invented back in the late 1800's. James Sargent of Sargent & Greenleaf, was instumental in being the first to install a time lock onto a bank vault door using parts from locks and two, eight-day kitchen clocks. He personally connected the time lock to the vault door of the First National Bank in Morrison, Illinois, on May 26, 1874 and this lock remained in place for nearly forty years until the bank had a larger vault built.
Time locks are usually installed on the inside of a safe or vault door making it impossible to tamper with the lock once the door has been closed without physically cutting into the safe which would obviously take time and make a great deal of noise. The idea of a time lock is to set the safe to open at a particular time - usually at the start of the next working day. For instance, if your business opened at 8am and closed at 5pm, at closing time, you would set the clock for 8am the next day. Once closed, no-one can open the safe before the set time. This is a deterent to would be thieves who may plan to take an owner or employee hostage in the middle of the night and try to force them to open the safe under duress. Usually, businesses post signs around the premises to inform would be thieves that the safes are time locked in the hope that this will deter them from attempting this method in the first place.
There are usually 2 'movements' in a standard time lock, although it is possible to have a 3 or even 4 movement time lock. The reason is simple. If one of the time movements fail, one of the others will continue to run and allow the door to open at the stated time.
Operating a time lock
With the safe door open, a key is pushed onto one of the time lock movement arbors and the key turned to the amount of hours which you want the safe to remain locked. This is done on all movements in the time lock. Push the locking trigger in the centre. The safe is then closed and the bolts thrown by turning the safe lock handle.
The safe is now secured until the time locks run down allowing the safe door to open.
Some of the more well known manufacturers of safe time locks are:
Sargent & Greenleaf - often refered to as S&G (USA)
STB (Switzerland)
Relhdis SA
Chubb (UK)
A single time lock 'movement' & A 3 movement time lock


Time Delay Locks

Time delay locks are so called because they delay the opening of the safe. Although this may seem counter productive, the idea is to make the job as difficult to possible for a thief who has decided to hold a member of staff under duress. Imagine if you will, that you are a thief and you are holding a staff member at knife point and insisting that they open the safe. The staff person can comply with all of your wishes and start to open the safe - but the time delay lock will make you wait until a set time has passed before it can open. You, as the thief will be constantly under pressure and will want the money straight away - but you can't - and not because the person in front has stopped you. It is the safe that has stopped you. In most cases, the thief tries to have a go at the safe to make it open more quickly, but again in most cases, he fails. Because of this, firms post time delay warning posters around their premises telling potential thieves that their safes have time delay systems in operation. Hopefully, this will act as a deterent and put off the thieves even before they start.